

Foreword
Apache IoTDB introduced a brand-new native distributed architecture in version 1.0. It features data partition storage with high scalability and multi-replica storage with no single point of failure, ensuring high availability. Additionally, it supports multiple consistency protocols to adapt to different scenarios. So, what does IoTDB's distributed architecture look like? How can we efficiently utilize IoTDB's distributed capabilities? Join us in a three-part series to uncover the details of IoTDB's distributed features!
This article will primarily introduce the characteristics of IoTDB's distributed architecture and how to maintain an IoTDB cluster.
Distributed Architecture in Apache IoTDB
What is distributed computing? A distributed system is a group of independent computers that communicate over a network and present themselves as a unified entity. In IoTDB, the native distributed architecture divides the services into two parts: ConfigNode and DataNode.
ConfigNode (C or CN): Management nodes responsible for managing partition tables and node information, load balancing, etc.
DataNode (D or DN): Data nodes can be broadly divided into five main modules:
Query Engine: Responsible for parsing query statements, computing distributed query operators, and scheduling.
Storage Engine: Optimized for high-speed writing of time-series data using a class LSM engine tailored for data scenarios.
Metadata Engine: Manages metadata, including in-memory metadata and its persistence.
Consensus Engine: Manages the availability and consistency among multiple replicas.
Stream Processing Engine: Efficiently extracts, processes, and alerts real-time data.
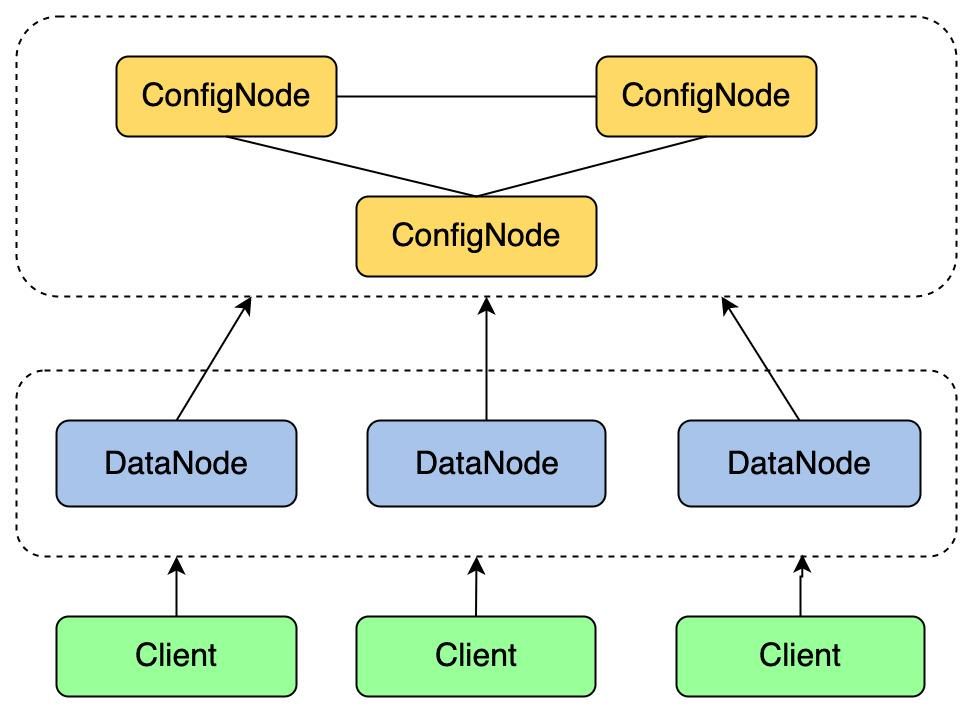
The architecture above represents a typical 3C3D cluster, which has 3 CNs and 3 DNs.
In practical usage:
Clusters are usually configured with 1 or 3 CNs, and CNs only provide services to DNs.
DNs can be configured with at least 1 node based on demand (currently, IoTDB can be configured with up to 3C100D in a production environment).
Clients can connect to any one or multiple running DNs. Regardless of whether connected to one or multiple DNs, clients can read all the data from the cluster and complete any data insertion. Clients are not aware of CNs. When clients are configured to connect to multiple DNs, they can seamlessly switch connections if some nodes fail, ensuring uninterrupted writes and queries for high availability.
Cluster Maintenance
After understanding IoTDB's distributed architecture, let's take a 3C3D cluster as an example and discuss how to maintain it efficiently.
Deployment
It is generally recommended to deploy multiple DNs on different nodes. CNs require fewer resources and can be deployed on the same nodes as DNs or on separate nodes. For a 3C3D cluster, it is typically deployed on three physical machines, each hosting 1C1D.
Modify the hosts file by executing the following on all three physical machines:
echo "192.168.132.10 iotdb-1"  >> /etc/hosts
echo "192.168.132.11 iotdb-2"  >> /etc/hosts
echo "192.168.132.12 iotdb-3"  >> /etc/hosts
Startup
Since CN manages CN and DN nodes within the cluster, CN should be started before DN. All CNs and DNs need to register their information with an already running CN during their initial startup, by configuring cn_seed_config_node and dn_seed_config_node. Specifically, for the first CN to start, cn_seed_config_node should be set to itself.
Attention: Ensure the first CN starts successfully before starting other CNs and DNs.
Modify the configuration files located in
/data/iotdb/confas per the following table:
Start the first node: Login to the
cn_seed_config_nodenode, i.e.,iotdb-1 (192.168.132.10), and execute:
cd /data/iotdb
# Start ConfigNode service
sbin/start-confignode.sh
Notice:
Ensure the first node starts successfully before starting other nodes. Specifically, ensure the first CN service (i.e., the node configured in
cn_seed_config_node) starts successfully.If the startup fails, refer to the subsequent section for cluster cleaning instructions before attempting to start again.
Start the remaining two CNs: On nodes
iotdb-2 (192.168.132.11)andiotdb-3 (192.168.132.12), execute:
cd /data/iotdb
# Start ConfigNode service
sbin/start-confignode.sh
Start the three DNs: On all three nodes, execute:
cd /data/iotdb
# Start DataNode service
sbin/start-datanode.sh
Verify cluster status: Connect to any node using CLI and execute the following command:
/data/iotdb/sbin/start-cli.sh -h iotdb-1
IoTDB> show cluster;
# Example output:
+------+----------+-------+---------------+------------+-------+---------+
|NodeID|  NodeType| Status|InternalAddress|InternalPort|Version|BuildInfo|
+------+----------+-------+---------------+------------+-------+---------+
|     0|ConfigNode|Running|    iotdb-1    |       10710|1.x.x  |  xxxxxxx|
|     1|ConfigNode|Running|    iotdb-2    |       10710|1.x.x  |  xxxxxxx|
|     2|ConfigNode|Running|    iotdb-3    |       10710|1.x.x  |  xxxxxxx|
|     3|  DataNode|Running|    iotdb-1    |       10730|1.x.x  |  xxxxxxx|
|     4|  DataNode|Running|    iotdb-2    |       10730|1.x.x  |  xxxxxxx|
|     5|  DataNode|Running|    iotdb-3    |       10730|1.x.x  |  xxxxxxx|
+------+----------+-------+---------------+------------+-------+---------+
Shutdown
Since DN connects with the client, and CN manages CN and DN, the shutdown sequence should be Client → DN → CN.
Stop all read/write operations: Stop client connections.
Stop all DNs: On all three nodes, execute:
# Stop DataNode
./sbin/stop-datanode.sh
Stop all CNs: On all three nodes, execute:
# Stop ConfigNode
./sbin/stop-confignode.sh
Upgrade
When upgrading the cluster, data and log information between different versions are compatible. However, due to new features and bug fixes, related libraries and sometimes scripts need updating. Therefore, the lib and sbin directories must be replaced.
Stop the cluster as described above.
On each node, delete the old version's
libandsbindirectories from the IoTDB root directory:
cd /data/iotdb
rm -rf lib
rm -rf sbin
Move the new version's
libandsbindirectories to the IoTDB root directory:
cd /data/iotdb
mv /data/new_iotdb/lib .
mv /data/new_iotdb/sbin .
Start the cluster as described above.
Expansion
Cluster expansion usually refers to improving the overall performance of IoTDB by horizontally adding more nodes and deploying DNs on them.
The expansion process is the same as starting additional nodes as described above. For the new node with IP 192.168.132.13, ensure:
The expansion node is an empty node without any data in its
datadirectory.The
cluster_nameiniotdb-common.propertiesmust match the existing cluster.The
cn_seed_config_nodeanddn_seed_config_nodeconfigurations must match the existing cluster.Existing data will not automatically migrate to the new node; new metadata and data will be allocated to the new node.
Add the new node's IP to the hosts file on the existing nodes:
echo "192.168.132.13 iotdb-4" >> /etc/hostsSet hosts on the new node:
echo "192.168.132.10 iotdb-1"  >> /etc/hosts
echo "192.168.132.11 iotdb-2"  >> /etc/hosts
echo "192.168.132.12 iotdb-3"  >> /etc/hosts
echo "192.168.132.13 iotdb-4"  >> /etc/hosts
Modify the configuration files according to the following table:
Start the new DN on
iotdb-4 (192.168.132.13):
cd /data/iotdb
# Start DataNode service
sbin/start-datanode.sh
Verify the expansion result by executing
show clusterusing CLI:
/data/iotdb/sbin/start-cli.sh -h iotdb-1
IoTDB> show cluster;
# Example output:
+------+----------+-------+---------------+------------+-------+---------+
|NodeID|  NodeType| Status|InternalAddress|InternalPort|Version|BuildInfo|
+------+----------+-------+---------------+------------+-------+---------+
|     0|Config

Node|Running|    iotdb-1    |       10710|1.x.x  |  xxxxxxx|
|     1|ConfigNode|Running|    iotdb-2    |       10710|1.x.x  |  xxxxxxx|
|     2|ConfigNode|Running|    iotdb-3    |       10710|1.x.x  |  xxxxxxx|
|     3|  DataNode|Running|    iotdb-1    |       10730|1.x.x  |  xxxxxxx|
|     4|  DataNode|Running|    iotdb-2    |       10730|1.x.x  |  xxxxxxx|
|     5|  DataNode|Running|    iotdb-3    |       10730|1.x.x  |  xxxxxxx|
|     6|  DataNode|Running|    iotdb-4    |       10730|1.x.x  |  xxxxxxx|
+------+----------+-------+---------------+------------+-------+---------+
Similarly, using the start-confignode.sh script to start CN can also achieve CN expansion (generally, having 3 CNs is enough for high availability, and there is no need to expand beyond three nodes).
Shrinking
Cluster shrinking generally refers to reducing the number of DNs, which can be done by removing already started DNs from the cluster.
On
iotdb-4, execute:
cd /data/iotdb
# Method 1: Remove using ip:port
sbin/remove-datanode.sh iotdb-4:6667
# Method 2: Remove using NodeID from `show cluster`
sbin/remove-datanode.sh 6
Verify the result by executing
show clusterusing CLI:
/data/iotdb/sbin/start-cli.sh -h iotdb-1
IoTDB> show cluster;
# Example output:
+------+----------+-------+---------------+------------+-------+---------+
|NodeID|  NodeType| Status|InternalAddress|InternalPort|Version|BuildInfo|
+------+----------+-------+---------------+------------+-------+---------+
|     0|ConfigNode|Running|    iotdb-1    |       10710|1.x.x  |  xxxxxxx|
|     1|ConfigNode|Running|    iotdb-2    |       10710|1.x.x  |  xxxxxxx|
|     2|ConfigNode|Running|    iotdb-3    |       10710|1.x.x  |  xxxxxxx|
|     3|  DataNode|Running|    iotdb-1    |       10730|1.x.x  |  xxxxxxx|
|     4|  DataNode|Running|    iotdb-2    |       10730|1.x.x  |  xxxxxxx|
|     5|  DataNode|Running|    iotdb-3    |       10730|1.x.x  |  xxxxxxx|
+------+----------+-------+---------------+------------+-------+---------+
Similarly, using the remove-confignode.sh script to remove CNs can also achieve cluster shrinking.
Cleaning
If you want to modify parameters that cannot be changed after startup, encounter startup errors, or for any other reason, you need a "fresh" IoTDB, you must clean the cluster, primarily the data directory.
Stop the cluster as described above.
Clean data by executing the following on each node:
cd /data/iotdb
# Clean ConfigNode and DataNode data
sbin/destroy-all.sh
Alternatively:
# Clean ConfigNode data
sbin/destroy-confignode.sh
# Clean DataNode data
sbin/destroy-datanode.sh
Follow the startup steps described above to restart the cluster, and you will have a "fresh" IoTDB.
Conclusion
This article is the first in a three-part series on Apache IoTDB's distributed architecture. It primarily introduces IoTDB's native distributed architecture and how to efficiently maintain a cluster based on this architecture. We hope you can understand its distributed design through this series and efficiently use IoTDB clusters.
Want to know how IoTDB achieves high availability and high performance for billions of time series with 2 replicas in a 3-node scenario under this distributed architecture? Stay tuned for the next parts of our series, where we will uncover two core designs in IoTDB's distributed architecture:
Data Sharding and Load Balancing
Replica, Consensus Protocol, and High Availability
Authors
This blog is a collective effort by several dedicated contributors from the Apache IoTDB community. We appreciate the valuable input and thorough reviews from our community members, ensuring the accuracy and quality of this publication.
For any questions or further discussions, please feel free to reach out to Xinyu Tan (tanxinyu@apache.org), senior software engineer at Timecho and one of the authors.
We look forward to hearing from you!


